Gift vouchers bring in money now for visits later, and they’re easy to sell all year round, not just at Christmas. This guide takes you through the whole thing in order: setting vouchers up, getting them in front of buyers, selling them online and at the till, taking them when guests come in, and keeping an eye on the money. Each step links to a fuller article if you need more.
Before you start
- You’ll need an admin login for the voucher settings and the sales report. Your team can sell and redeem vouchers on their own logins.
- Online sales need Stripe. Buyers pay on your voucher page by card, and the money goes into your own Stripe account. If you haven’t connected it yet, see Connecting card payments with Stripe.
- Selling at the till doesn’t. You can sell vouchers in person straight away, even before Stripe is set up.
1. Set up your vouchers
In NomNom Web, open Settings (account menu, top right, or the bottom of the left-hand bar) and choose Vouchers under PAYMENTS. Each change saves as you make it. Work down the page:
- Sell vouchers — switch it on to open your voucher page for sales.
- VOUCHER PAGE IMAGE — a photo for your voucher page. An upright photo fits best. With none, your booking page header image is used.
- PRICING — the amounts buyers can pick, such as £25, £50 and £100. Click + Add to add one, or click an amount to change it.
- CUSTOM AMOUNT — set a Minimum and a Maximum to let buyers type their own amount (see Letting guests choose their own gift voucher amount).
- VOUCHER LIFE — Expires after sets how long a voucher lasts, from 3 to 36 months. Auto-close threshold closes a voucher once a redemption leaves less than that amount on it.
- NOTIFICATIONS — Sales email is where a note of each online sale goes. Leave it blank to use your account email.
- TERMS & CONDITIONS — click Edit terms to write your own, or leave them blank for the built-in terms. They’re printed on every voucher, so add anything guests often ask, such as Vouchers can’t be used to pay a deposit when booking online.
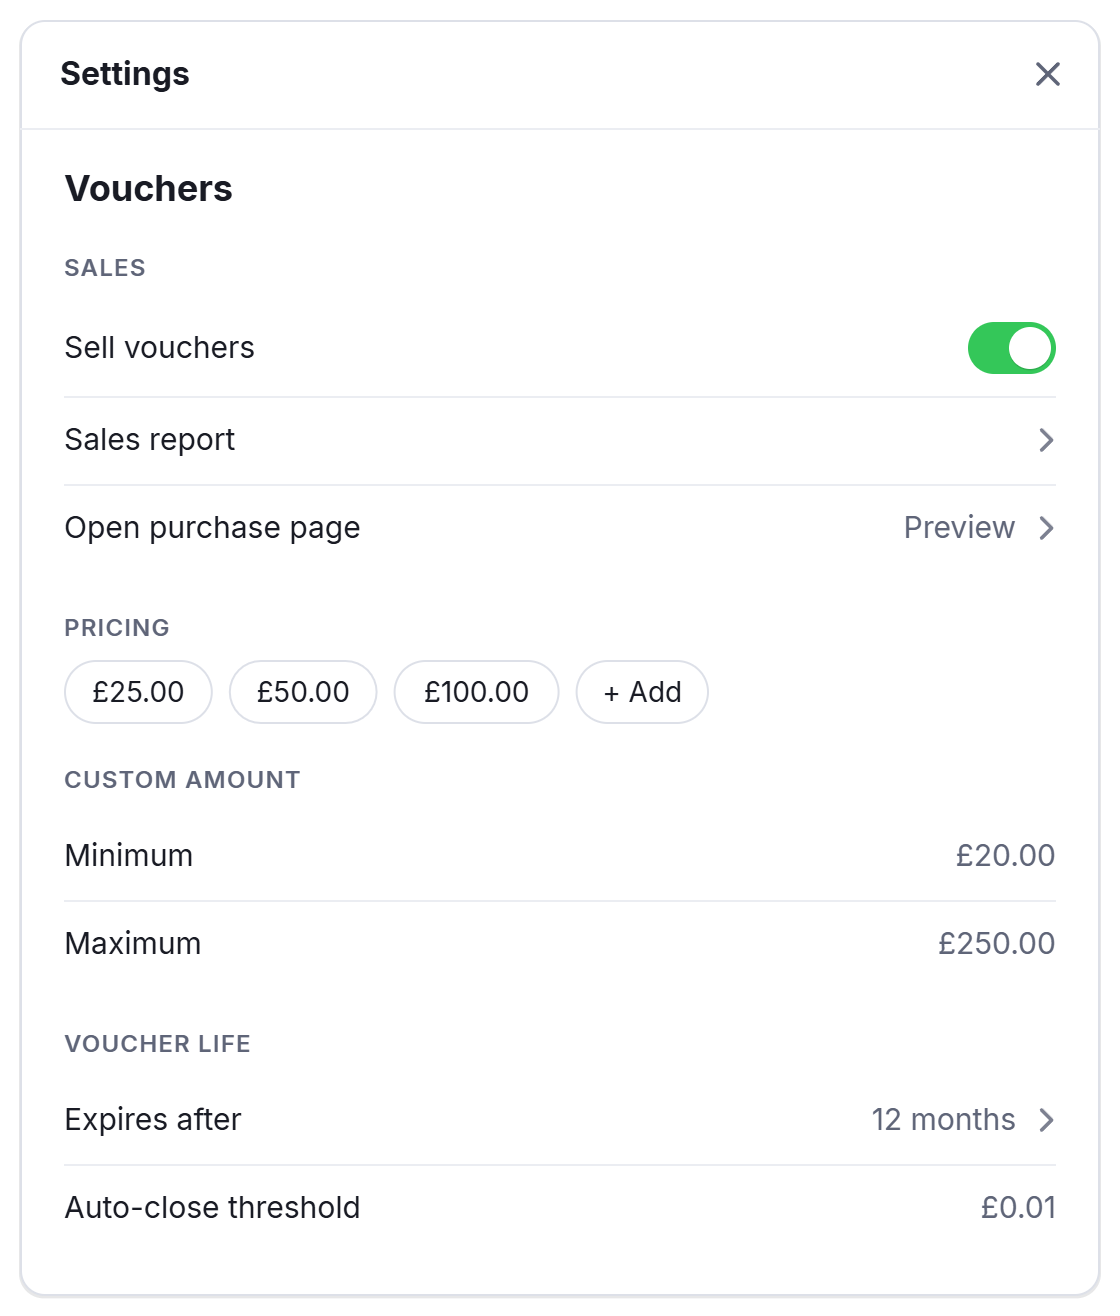
Every setting is explained in Selling gift vouchers. For a seasonal deal on one amount, such as a Christmas Special with its own valid-until date, see Special-offer gift voucher amounts.
In NomNom Web: Settings → Vouchers. In the phone app: Settings → Vouchers.
2. Check your voucher page
Click Open purchase page in the same settings to see your voucher page exactly as buyers do. Buyers choose an amount, give their own details, say who it’s for, add a message if they like, choose when it’s sent and pay by card on Stripe’s secure page.
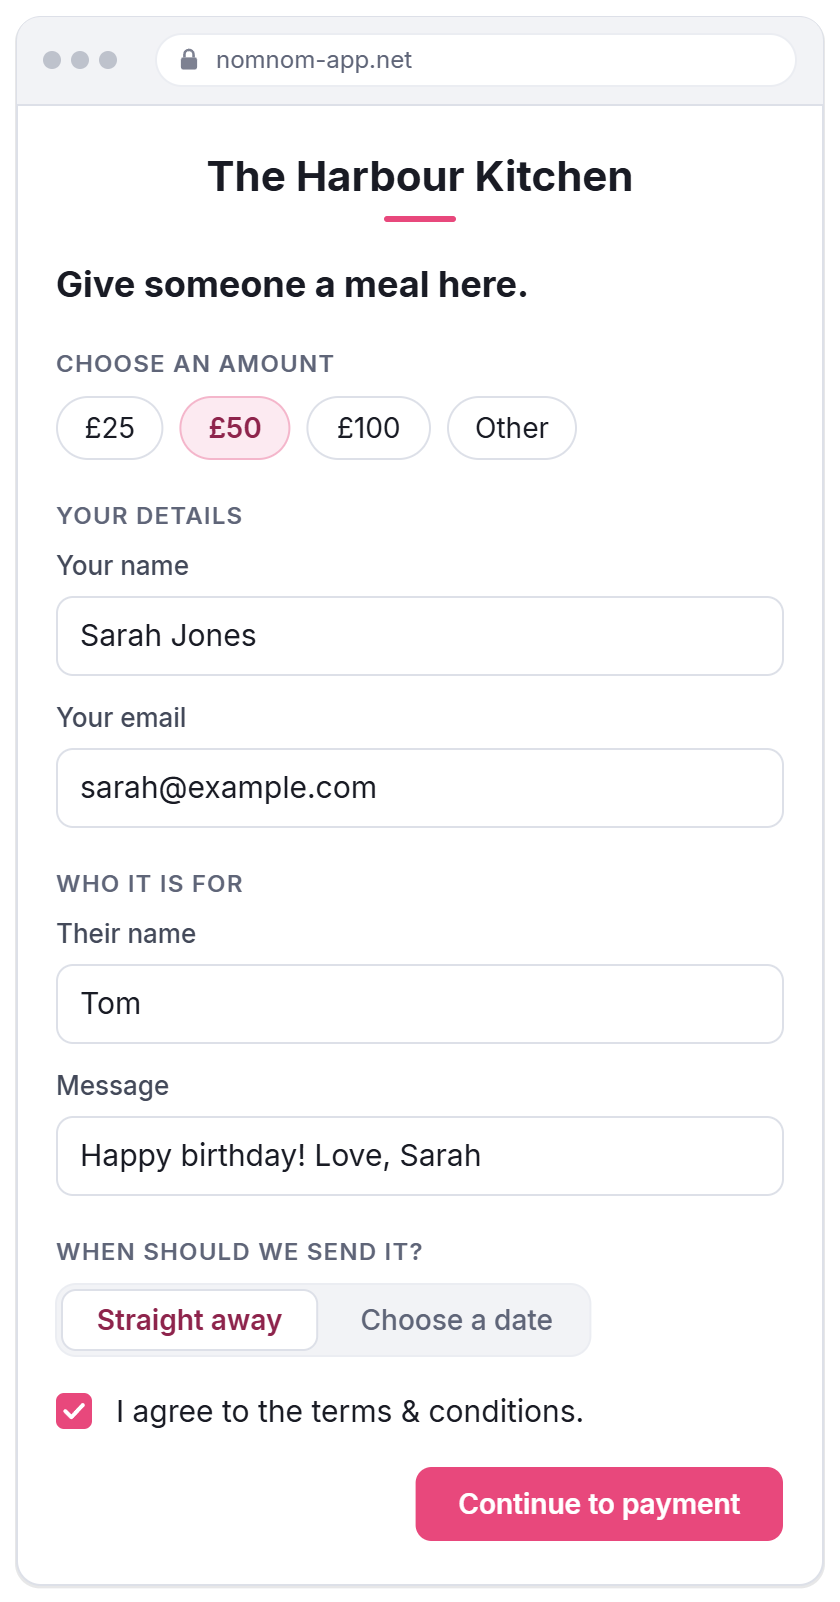
If the page says Gift voucher sales are temporarily unavailable, check that Sell vouchers is on and that your settings don’t show Stripe onboarding incomplete — vouchers paused. Buying, step by step, is in How guests buy a gift voucher.
3. Share it
Your voucher page’s address is your booking link with /vouchers on the end, and it never changes. Copy it once from Open purchase page, then put it everywhere buyers might look:
- a Gift vouchers button on your website, beside your booking button;
- your Instagram and Facebook bios, and posts before Christmas, Mother’s Day and Valentine’s Day;
- an update with a Buy button on your Google Business Profile;
- your email signature and newsletters;
- a QR code on table talkers, menus or the bill folder.
Your booking page and Discover listing link to it too, while vouchers are on sale. See Sharing your gift voucher page.
4. When someone buys online
As soon as the payment goes through:
- The buyer sees the voucher code and a Download PDF button, and gets an email with the printable voucher.
- You get a sale email showing the amount, NomNom’s fee and what’s net to you. It never includes the code.
- The person it’s for gets the gift email if the buyer gave their address, either straight away or on the date and time the buyer chose, such as a birthday morning.
There’s nothing for you to do: the voucher is ready to spend. See When gift voucher emails go out.
5. Selling at the till
For a guest who asks on their way out:
1. Open Vouchers. In NomNom Web, click More (the three dots in the top bar), choose Vouchers and click Sell. In the phone app, open the menu, tap Vouchers, then Sell.
2. Fill it in. Type the Amount, choose how they paid under Paid by (Card reader, Cash or Other) and add the Customer name. Add their email to have the voucher emailed, and Gift details (optional) for a recipient’s name and message.
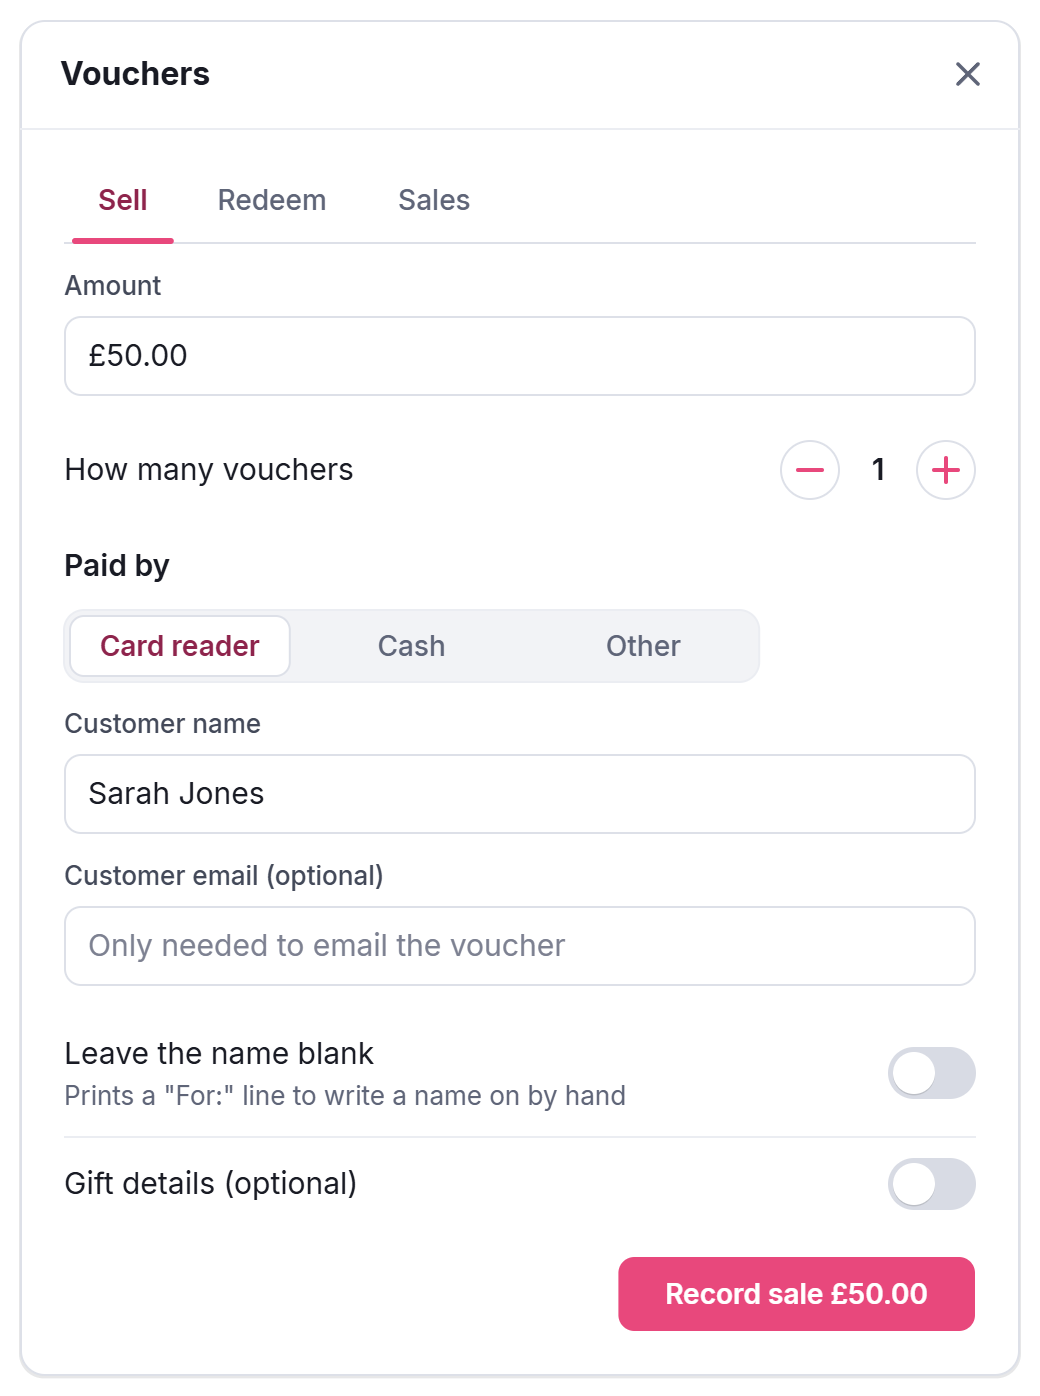
3. Take the money, then click Record sale. Take the payment on your own card machine or in cash first.
4. Hand it over. Click Print, or Download for a PDF. Make sure the guest has it before you move on: the code isn’t shown in your sales list afterwards.
There’s no NomNom fee on these, because the money goes through your own till. You can sell several vouchers for the same amount in one go, up to 50, each with its own code (see Selling several gift vouchers at once). For a complimentary voucher, such as a raffle prize, choose Other under Paid by. See Selling gift vouchers in person.
6. When a guest pays with a voucher
1. Open the Redeem tab. More → Vouchers opens on it.
2. Look it up. Type the 16-character code from the voucher or email and click Look up voucher. In the phone app you can tap Scan QR Code instead.
3. Take off the bill. Amount to redeem starts at everything that’s left. Change it to the bill to spend part of the voucher, then click Redeem. Whatever’s left stays on it for next time.
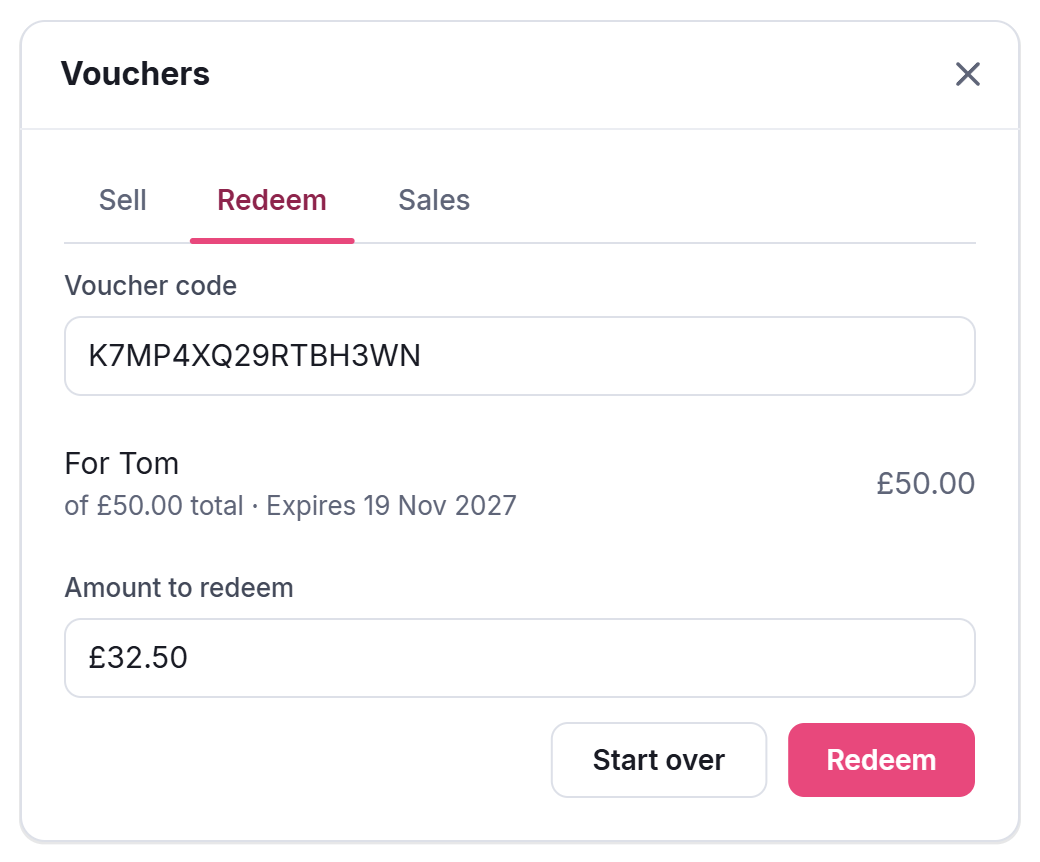
Guests can’t use a voucher on your booking page or to pay a deposit: they book as usual and hand it over when they pay. See Redeeming a gift voucher and spending part of it and Can guests pay with a gift voucher when they book online?
7. Keeping track
The Sales tab, next to Sell, lists every voucher, online and in person, with totals across the top: Sold, Redeemed, Outstanding (what guests can still spend with you), Breakage (left unspent on expired vouchers), Refunds and Platform fees. Click a voucher to see its history. The tab is for admins.
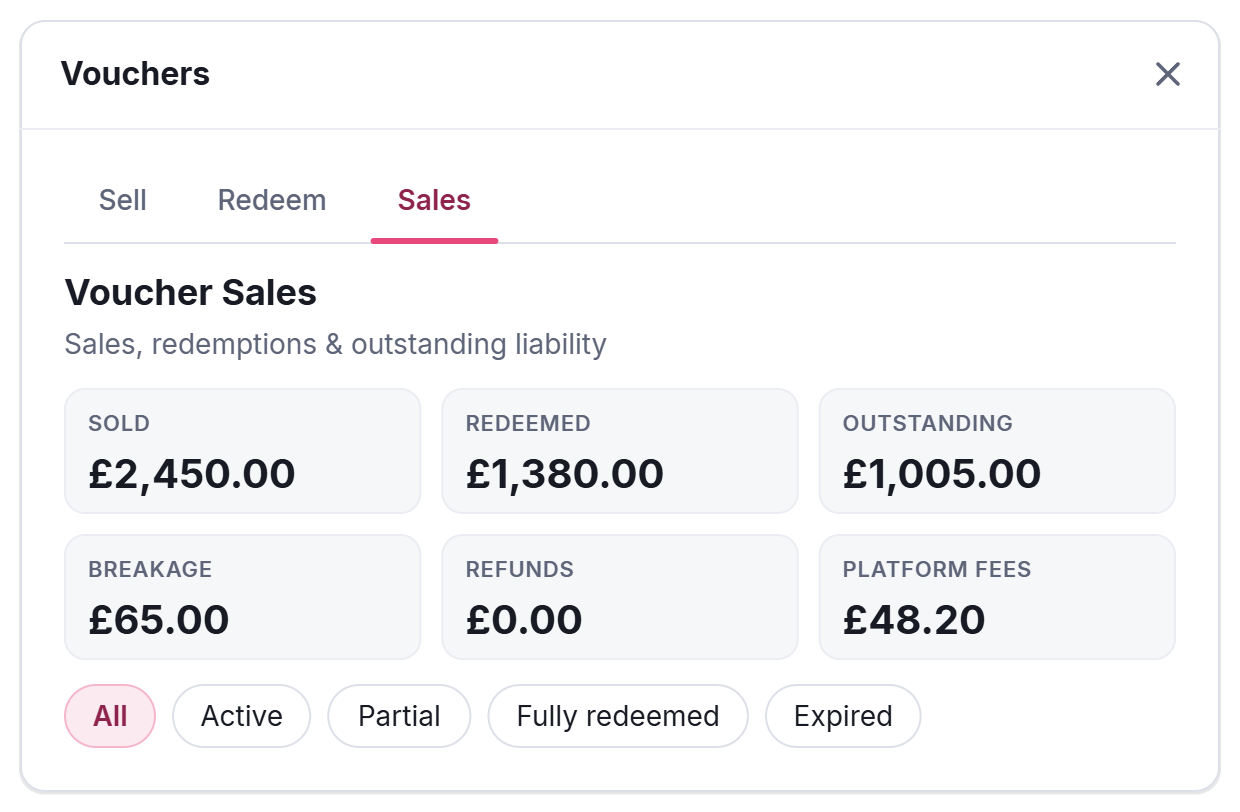
Each status, and what counts towards each total, is explained in Understanding your voucher sales report.
8. The money
- Bought online: paid straight into your Stripe account, less NomNom’s platform fee and Stripe’s card fee. Stripe then pays it into your bank on its usual schedule.
- Sold at the till: goes through your till and card machine as usual. NomNom just keeps the record.
- When it’s spent: nothing more is charged, however many visits it’s spread over.
See What NomNom and Stripe charge on deposits, vouchers and SMS and When deposit and voucher money reaches your bank.
When something goes wrong
- A guest has lost their voucher, or its link has run out. Download links last 7 days; the voucher lasts until its Valid until date. See A guest has lost their voucher, or its link has expired.
- They need it again. An admin can email it again from Sales (see Resending a gift voucher to the guest or the buyer), or print or share it (see Printing or sharing a gift voucher again).
- Wrong amount, rung through twice, or a refund. Void a voucher sold in person; refund one bought online through Stripe. See Refunding, cancelling or voiding a gift voucher.
- It has expired. Nothing can be taken off it, and the date can’t be moved. To honour it anyway, sell the guest a new voucher for what was left, choosing Other under Paid by.
Before you launch: a quick checklist
- Sell vouchers is on, and there’s no Stripe warning in your voucher settings.
- Your amounts, expiry and terms are how you want them.
- You’ve opened your voucher page and it looks right on a phone.
- The link is on your website and social media.
- Your team knows where Sell and Redeem are, under More → Vouchers.
- You’ve bought a small voucher yourself to see the emails your guests will get.
In NomNom Web: Settings → Vouchers to set up, and More → Vouchers to sell, redeem and see sales. In the phone app: Settings → Vouchers, and menu → Vouchers.